Using Effects and Controllers to Make Drum Samples Come to Life
This blog post is about Sensory Percussion version 1 and does not apply to the latest version 2 software included in the EVANS Hybrid Sensory Percussion bundle.
Using and controlling audio effects is one of the best ways to develop your own sound as an electronic drummer. Filters, EQ, delay, distortion, modulation fx (chorus, phaser, flanger), reverb, and compression are all crucial tools in sculpting your sound.
In this article we'll be diving into all of the different effects parameters and some of the best ways to make that sound that's in your head come to life. Check out the video below for an in depth overview of effects parameters (and great ways to use them!).
Delay
Delay is an amazing and powerful spatial effect. In a nutshell: it just repeats the sound a number of times, sometimes modulating the echoes in different ways. But there's so much beauty and nuance once you dive into the parameters.
Type: Sensory Percussion has several different delay emulators: tape echo (tube/solid state), modulation delay (with vibrato/chorus), oil can delay (my favorite: emulating old oil can units), and digital delay. Each type has a different spacey characteristic.
The Time, Feedback, and Mix parameters are the most important. Time (in ms) is the amount of time between repeats.
Feedback is the amount of repeats (in percentage): if set to 0%, then the delay will only repeat the sound once, if set to 100%, the delay will repeat infinitely (and -- in some units -- build up and self-resonate chaotically, but Sensory's delays guard against that).
Mix is simply the ratio of audio that is affected by the delay (verses: passed through unprocessed).
Level is also an important parameter. Depending on the feedback setting, the delay will fade out eventually, but the level parameter will scale the delay's volume. Therefore, if the level is set high, then the echos will be loud and take longer to fade out.
Modulating the time parameter will cause some really fun pitchy echoes. Check out the video above to hear it in action.
Filters and EQ
The frequency content of a sound is one of the main ways we are able to identify what the sound is, and so cutting or boosting frequencies of a known sound is a great way to give human brains something new and exciting to chew on.
In truth, pretty much anything you do with a filter effect is possible by using a multiband EQ, but it's often easier, faster, and less CPU intensive to use the filter, which just has a few exposed parameters.
Filter Parameters
Filters in Sensory Percussion can be set to Low Pass, High Pass, Band Pass, Notch, Peak, Low Shelf, and High Shelf. And the filter has cutoff and resonance knobs.

Low Pass filters let the “lows pass” through the filter, removing all the high sounds above the cutoff frequency. The lower the cutoff frequency, the more muffled the sound.
High Pass filters let the “highs pass” through the filter, removing all the low sounds below the cutoff frequency. This type of filter often sounds like an old radio with small speakers.
A Band Pass filter removes all low and high frequencies except for a section around the cutoff frequency. Adjusting the resonance parameter widens and narrows the band.
A Notch filter creates a crater around a specific frequency: removing all sound around the cutoff frequency, but leaving the rest of frequencies alone. Again, adjusting the resonance widens and narrows the crater.
A Peak filter does the exact opposite of a notch filter: it boosts the sound directly around the cutoff frequency, increasing the resonance narrows the peak, decreasing the resonance widens the peak.
Low and High Shelf filters are less extreme than Low and High Pass filters, they simply reduce the volume of the frequencies above or below cutoff frequency.
The Cutoff is simply the frequency at which the filter will start removing sound.
The Resonance is how sharply the filter cuts around the cutoff frequency. Anything above “1” is actually boosting the frequency right at the cutoff. In an EQ, this parameter is called “Q.”
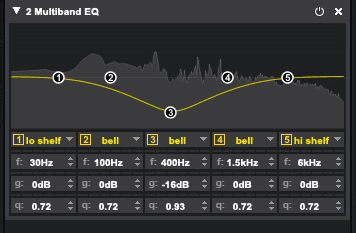
EQ Parameters
Sensory Percussion has a 5-band Equalizer with a built in spectral analyzer that is helpful when you need more precision and flexibility than a single filter.
Each band can be set to most of the same filter parameters, and you can use and control multiple bands at once.
The most common use for a band is in bell mode and it sounds really cool to automate the frequency, gain, and Q of individual bands -- as demonstrated as the “trickly EQ effect” in the video above.
Distortion/Saturation
Sensory Percussion has two different harmonic distortion effects: 12AX7 tube amplifier emulation, and a soft clipper.
Using controllers to automate drive and color on the 12AX7 tube emulation is a great way to make your mark! I like to use thresholded-speed controllers to make the tubes scream when I play buzz rolls (see the video above).
The ceiling is the most important parameter for the soft clipper. Set it low to introduce clip and harmonically distort even at low volumes. This tool is also very useful to put with a high ceiling setting at the end of all of your channel effects: it sounds much nicer than accidentally clipping.
Modulation FX: Chorus, Flanger, Phaser
Though these effects (chorus, flanger, phaser) are created similarly: by modulating very short delays (we're talking 20 ms or less), they each have their own distinctive ear-flavor.
In the video embedded above, I walk you through some of my favorite mod FX techniques.
In general chorus sounds great on drum sounds (not to discount phaser and flanger, though, but they often sound best on tonal sounds).
In all of these effects I love a slow rate (fast can be very intense), and I love to control feedback.
Reverb
Reverb is the word we use to describe sounds interacting with space. When we produce sound it bounces around its environment, reflecting off surfaces which filter it in various ways.
Reverb works great as a parallel effect: that means you put it on an auxilary track with its mix set to 100% and then send various amounts of the audio signal from one or more dry tracks to the auxiliary track. This works well because it's how reverb works in real life: picture making a sound with your mouth -- the sound exits your mouth, and then it reflects off of the surfaces in the room.
If you just put a reverb effect directly on the sound source: it's like the sound reflected off the surfaces of the room at the same time it exited your mouth. And I think that's cool, and I do it all the time, but if you're going for more realism, then putting it on a send track is the way to go.
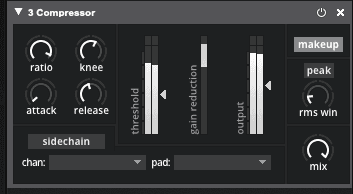
Compression
Compression is an audio effect that squashes the dynamic range of what it's affecting. At its most extreme, it makes the quiet parts of whatever is sent through it as loud as the loud parts (if you use makeup gain, if not: then it makes the loud parts as quiet as the quiet parts).
The most important parameters in a dynamic compressor are threshold, ratio, attack/release, makeup gain, and sidechain.
For an extreme, “pumping” compressor, you'll want to have a low threshold setting, a high ratio setting, a relatively fast attack and a relatively slow release.
In a future installment of EDS we'll go over fun sidechain compression techniques. Stay tuned!